In a previous blog-post, we taught you where to get sandbags in the City of Los Angeles, and how to properly fill them. Now, let’s get to stacking.
Sandbags are simple and effective, but only if you stack them correctly, and BEFORE your property is threatened by water or debris flows. Remember: floodwaters can’t be stopped, they can only be re-directed.
Thus, the idea of sandbagging is to divert water and debris flows. Don’t get caught up in trying to make a dam to stop water. That’s a losing battle. Instead, think of ways to encourage the water toward areas of your property where it can drain off naturally, and without damaging anything.
Here are step by step instructions for creating an effective water and debris diverting sand bag berm:

- Start with your 1/3 to 1/2 filled sandbags.
- Lay the bag flat and roughly parallel to the expected flow of water and debris.
- Make sure the closed end of the sandbag is facing in the general direction of the expected flow, and fold the open end of the sandbag diagonally away from the expected flow. (see below)

- Lay the next bag over the diagonal fold of the first bag so that they partially overlap each other.
- Stamp them down firmly with your feet or knees as you repeat the process of laying a line of sandbags, compressing the sand, flattening the sandbag, and creating a tight seal.

A single-stack sandbag berm usually works well, but is generally not recommended to be above three layers in height. That’s about a foot tall. If you’re expecting more water than that, consider a pyramid sandbag stack. To create a pyramid berm that’s two feet tall, you’d ideally have a base that’s about five feet wide. A four-foot tall berm would require a base about 9 feet wide and so on. (see illustration below) But, in most cases, one to two feet is enough to re-direct water and debris flows.

What if you’re worried about water pooling-up and flowing into your foundation or into your home? You’ll need a sandbag barrier with a wood and poly-propylene plastic backing to do the job.
Here’s what you’ll need:
- a roll of poly-propylene plastic sheeting
- a roll of good duct tape.
- 1/4 inch thick plywood cut to the length of the opening you’re trying to seal-off.
- enough sandbags to create a diversion berm.
Here’s what you do:
- Lay out the sheet of plastic about four or five feet wide, and the length of the barrier you want to create. (say, the size of a sliding glass door or air-vent in your home’s foundation)

- Use half the width of the plastic sheeting to climb at least two feet up the wall of the building along the entire area you want to build your berm.
- Tape the plastic sheeting to the wall.
- Place your plywood on the plastic against the opening you want to protect.

- Lay your sandbag berm as before, but on top of the remaining plastic sheeting, and firmly against the plastic and plywood on the structure side of your berm.
That should be sufficient to divert most water and debris flows from entering your home or foundation.
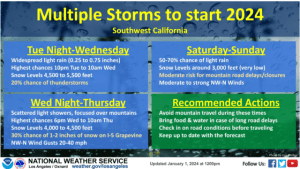
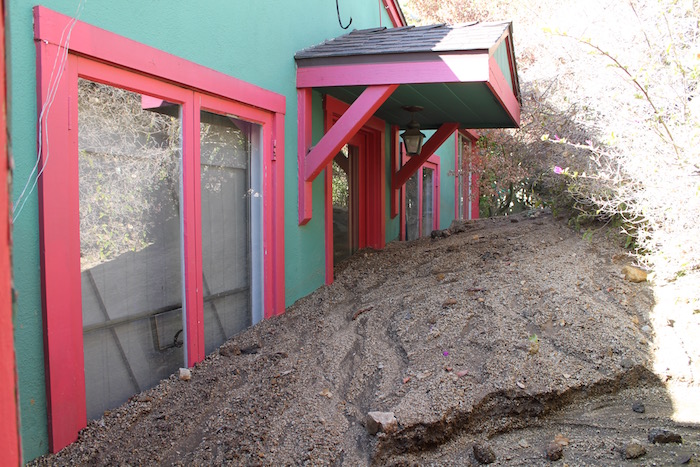
Remember, El Niño is here, and it will more than likely bring us a lot of rainfall and the problems that go with too much water in a relatively short period of time. However, with a little fore-thought and planning, you should be able to identify potential problem areas of your property, and come up with a plan to divert water and debris flows away from your home. But don’t wait until the rains start to fall and the mud starts to flow.